The Garage Cabinet, Garage Floor Coatings,
and Closet Systems Experts
and Closet Systems Experts
![]()
Phone: 302-945-2200
Showroom: 22797 Dozer Ln
Harbeson, DE 19951
![]()
Phone: 302-945-2200
Showroom: 22797 Dozer Ln
Harbeson, DE 19951

Quick and Easy Assembly |
|
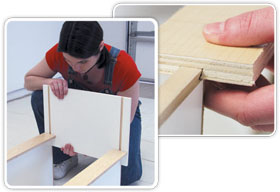 |
The Patented Dovetail DesignAll cabinet components slide together without force or effort because of Slide-Lok’s patented Dovetail assembly system. Assembling your Slide-Lok garage cabinets is quick and easy. Click here to watch Bob Vila's segment on assemblying and installing our cabinets!
|
Installation |
|
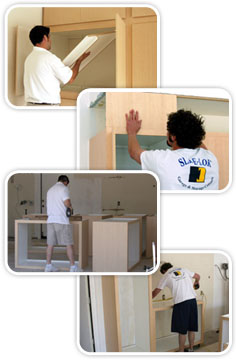 |
Professional Installation AvailableYour local Authorized Slide-Lok Dealer will be happy to assist you with installation of your Slide-Lok garage storage solution. Click here to locate your local Slide-Lok Garage Interiors & Storage Cabinets dealer. Perfect for the Do-it-yourselfersIf you should decide to assemble your Slide-Lok Garage Cabinets yourself, each Slide-Lok garage storage solution comes with the hardware needed for assembly and installation and is accompanied by detailed assembly instructions. The Slide-Lok garage storage solution is easy to assemble and install because of our patented Dovetail assembly system. All components slide together without force or effort. All of our garage cabinets Feature:
|
Assembly Tips |
|
|
Please read the enclosed directions a few times. All the cabinets assemble in the same order. When applying glue to the edges, it is a good idea to leave about four inches of unglued material so that when you slide the pieces together the glue does not "glob out". Glue ALL joints, as the video shows them gluing one only and forgetting the others. When installing the interior corner braces, I have found it best to attach the brace to the side first, and then the face frame. BE CAREFULL when you screw them in, as too much pressure can create a gap between the side and the face frame. If you notice a gap has been created, simply unscrew the corner brace and re do in a slightly different position. If you have a brad nail gun, use one inch 18 gauge wire brads to tack the sides to the face frame, and to tack the sides to the top and bottoms, and to tack the nailing rails to the sides and top and bottom. If you are not nailing, put the cabinet in a level place and allow glue to dry. Make sure the cabinet is square and the joints are all secure before letting the glue dry. After the cabinets are dry, use installation tips to attach cabinets to the wall. Put the shelves in before putting the doors on. You can do them after but access is easier now. When locating the shelves, put a screw into the center of the clip and into the sides of the cabinet, then after positioning the shelf, secure the shelf but screwing up through the bottom of the clip into the shelve. Be sure to push in on the sides of the rear of the cabinets when securing the shelf, as this will help add rigidity to the cabinet. Add doors; add bumpers in the extreme corners of the doors (they must bump against the face plate). Adjust doors to be level, even and adjust the gap in the middle. Now shim the rear of the cabinets if necessary to insure that the doors will remain closing properly when the cabinet is screwed permanently to the wall studs. If the walls are out of plumb, you will notice the doors don't quite close properly unless shimmed. |
|
Installation Tips |
|
|
Build all cabinets for "section" you are ready to install. If you are putting backs on the cabinets, be sure that the back material is NOT installed Leave the doors off and shelves out for now. Place the first cabinet on left side, where you want it. Adjust the legs so that the rear of Next, set the next cabinet to the right of the installed one, and adjust the legs on this one Continue to work to the right, keeping the bottoms level and screwing the face frames Now you are ready to add any stackable. Put the little dowels in the holes (pre drilled) in
|
|
Please call: 302-945-2200 or Contact us › ›
Assembling garage and storage cabinets has never been easier. The Slide-Lok garage storage solution features a patented Dovetail assembly system to make assembling your garage cabinets quick and easy!
![]()